Best Teacher Gift – Fruit Bouquet

June 26, 2012

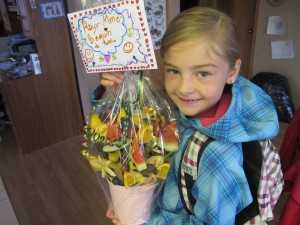
Fruit Bouquet – great for teachers, summer parties, house-warming or simply a new way to eat more fruit!

I’ve been trying to figure out what to do for my kids’ teachers present this year and stumbled upon “Edible Arrangements” – Fruit bouquets and decided to give them a try myself. Except for a lot of prep work, they are really easy and both of my kids (6 & 7 years old) were able to help make them.

If you don’t have time to make them, check out their website: http://www.ediblearrangements.ca  and simply order one of these fantastic bouquets!

What you will need:

FRUIT:

Apples, pineapple, melon, watermelon, cantalope, grapes (both green and red), strawberries and blueberries.

I don’t recommend using bannana as it goes off really quickly and can fall off the skewers really easily.

Cake Mix x 1 (This will make two small bouquets)

Cellophane& ribbon (optional)

Chocolate candy melts (optional)

Melon baller

Skewers – for this I used 6″ and 10″ skewers, but if available, I would also recommend some 8″ ones too.

Small Flower pot x2 (or you can use the inside of the pineapple also)

To get started, you need to bake the cake mixes in any pans you want… don’t worry what shape – because you are just going to smoosh them inside of the flower pot or pineapple. This makes it look like dirt:)

Then once your cake is inside your pots, you are ready to start building your bouquet…

Try different combinations of skewers, but in the very middle, I would put a flower skewer.  To make the flower, all I did was cut an apple in slices (cut with the top and the butt in between your hands and slice across – you’ve done it right if you get some that have a “star” in the middle) – then I took my paring knife and cut it out to make flower petals.   By alternating some fruit on the stick: grape/pineapple/grape upto the top, I then added the apple flower and a rounded piece of melon (using the melon baller tool).

Add as many skewers as you like until the bouquet is full.

I did some skewers dipped in chocolate.  I used the Wilton Candy Melts (which can just be put in the microwave to get them to be melted quickly) and dipped my strawberries and pineapple in them and put them aside separately so that the chocolate would dry before putting them in the bouquet.

Once they are all finished, you can wrap them in cellophane and tie with some ribbon, or you can just leave them out.

Deliver as soon as possible.

Cheers,

Cbreeze


Cake Pops – The Basics

March 16, 2012

Cake Pops!!

What are they, you ask? They are only the most delectable and cutest cake treats in bite-size form!! These adorable desserts are becoming the talk of the baking town but not all of us are sure of how to make them.  Have no fear, after you are done reading this, you too, can make creative and delicious cake pops!  I am going to give you the steps you need to make a basic cake pop.  Once you have the basics down, you can try many different shapes and designs and techniques.  Lets get started:

What you will need:

1 Box of Cake Mix (your choice)

1 Can of Frosting (your choice)

1lbs Wilton Candy Melts (any color/flavor you desire)

*I used two bags of Wilton Yellow Candy Melts for this demo*

Wax Paper

Cookie Sheet

1 Package of Lollipop Sticks

Decorations of your choice

Optional: (but helpful) Cookie scoop

Steps:

1. Bake cake according to directions in a 9×13″ baking pan.  After cooked, let cool completely.

2. Crumble cake (using your hands) into a large bowl.

3. Add a can of frosting to the crumbled mixture using the back of a large spoon to mix the icing into the cake mix. Add a few tablespoons at a time as to not over saturate the cake.  The consistency when the cake is ready should be similar to that of a ground beef mixture when making meatballs.

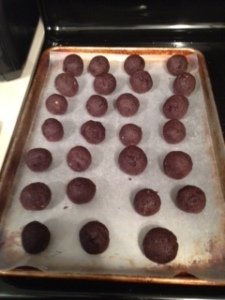
4. Once you are happy with the consistency, you can then use a spoon or a cookie scoop to measure out equal amounts of cake and roll using your hands, to make balls.

5. Place your rolled cake balls onto a wax covered cookie sheet and place in the fridge or a cool place for 10-15 minutes.

6. Once chilled, you can prepare your candy melts by microwaving in a microwave safe bowl. Make sure your bowl is not too deep as it will make it more difficult to keep your pops on their sticks.

7. Once your chocolate is melted, take your cake pops out of the fridge, and dip the end of each lollipop stick into the melted chocolate.  This will ensure the stick and cake ball stay together when rolling in the chocolate.

8. Once all your lollipop sticks have been put in all the cake pops, you must chill them for 5-10 more minutes. (Make sure to not let the cake pops get TOO cold. If they are too cold, they will crack the layer of chocolate once rolled.

9. After chilling for a few minutes, you may now dip your cake balls in your chocolate melts.  Use a spoon if you need to cover the top of the pop.  Once you have taken the pop out of the chocolate, tap the end of the lollipop stick gently to shake off any excess chocolate on the pop.

10.  If you prefer to have the cake pop fully round, you can insert the lollipop stick into a block of Styrofoam to hold it upright while it dries. For this demonstration, I have placed the cake pops directly upside down onto the wax paper.

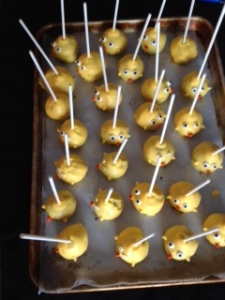
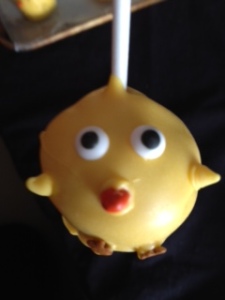
11. Once your cake balls are all covered in chocolate, you can cool them for another 5-10 minutes.  Once they are cool, you are free to decorate them however you please! I choose to make little yellow baby chicks since Easter is on its way and so is SPRING!! I used the leftover melted chocolate to adhere the decorations to the pops.

For the cute baby chicks, I used Wilton’s Edible Candy Eyeballs for the eyes, mini gingerbread men sprinkles for the feet and 1/2 of a orange chocolate sunflower seed for the nose. The arms are made out of mini edible yellow chocolate sprinkles I had found in my pantry – but there are lots of different decorations you can use that look just as great.

I hope this helps many of you who have always wanted to make Cake Pops but didn’t know how. There are a few steps involved but the first bite makes every step worth it!!

HAPPY EASTER EVERYONE

&

HAPPY CAKE-POPPING!!